最近,考虑为我的 MacBook Pro 购入一款外接显示器。
在调研和参考了各种排名和评测后,我最终选择了 Dell 的一款带翻转屏、高色域(99% sRGB)、出厂校色的 2K 显示器——P2418D。(此处推荐一个 App:盖得排行,一个非常好用的购物参考 App,以排行榜的形式呈现各行业领域的权威排名)
关于 Dell 显示器的小科普
Dell 是显示器出货量第一的品牌。Dell 显示器产品线虽然庞大,但命名规则相对清晰,总体分为 U/P/S/E 四大系列,分别代表 商务旗舰/专业商用/家用/入门商用。系列名后接四位数字,前两位代表尺寸,后两位代表发布年份,最后的字母代表分辨率,K/Q/D/H 分别代表 8K/4K/2K/1080p。
例如:我购入的 P2418D 就是 18 年发布的 P 系列 23.8寸 2K显示器。
JD 的物流还是很令人满意,一天之内就收货了。使用 MacBook Pro 连接上显示器,完美点亮,效果还算不错。但仔细观察后,问题产生了:在 2560x1440 分辨率下,可显示内容确实变多了,但是界面上的字体显得有些模糊和发虚,除此之外,虽然整个屏幕很大,但高分辨率导致的窗口字体过小也带来了观感上的不适。
MacBook 外接显示器为什么会有显示问题?
通过查阅资料,我明白了导致这个问题的原因:
Apple 在 2010 年发布 iPhone 4 时,第一次向世人展示 Retina 屏幕,而且在后续的几年发布的 iPad、MBP、iMac 等一系列产品上都采用了这一技术。当年乔帮主将这种高密度像素的屏幕命名为 Retina,主要是指在正常阅读距离下,人眼无法分辨屏幕上的像素颗粒,使得屏幕显示效果更为细腻平滑。Retina 屏与非 Retina 屏之间显示效果的区别如下图所示。

Retina 屏幕之所以可以做到细腻平滑,除了苹果产品屏幕的高PPI属性(事实上这也是为什么 iPhone XR 的屏幕被大家诟病那么多,因为 PPI 和竞品对比不占优势,甚至可以说是失去了苹果的优良传统),另一个重要的原因是一种称为 HiDPI 的操作系统渲染方式。
Retina 屏的设备拥有高分辨率却并没有让字体变小,其主要原因就在于,它在表达屏幕上每个像素元素时,都使用了 4 倍于非 Retina 屏的像素个数,这就是 HiDPI。这种渲染方式带来的一个最有利的结果就是,在确保了显示尺寸不缩水的前提下,让内容表达得更加细腻。
关于 Retina 的更多介绍可以查看参考1,具体细节不再赘述。
总结一下,就是高 PPI (硬件) + HiDPI 渲染(软件) = 更细腻的显示效果(Retina)。
好,那我们现在有一块 2K 的 23''8' 显示器,高 PPI 基本具备了,那么字体发虚等问题就在于:没有开启 HiDPI 渲染。由于 macOS 在 4K 以上的显示器才默认开启 HiDPI,因此,我们的 2K 屏就要自己动手开启。下面,我将具体介绍如何手动开启 HiDPI 模式使外接显示器达到 Retina 显示效果。
MacBook 外接显示器开启 HiDPI 模式教程
整个配置过程比较简单,整体思路是修改位于
/System/Library/Displays/Contents/Resources/Overrides/DisplayVendorID-xxxx/DisplayProductID-xxxx
的配置文件,写入需要 macOS 针对该型号屏幕输出像素数。
Step 1
通过在 Terminal 中输入命令,开启 HiDPI 模式
$ sudo defaults write /Library/Preferences/com.apple.windowserver.plist DisplayResolutionEnabled -bool true
Step 2
连接上显示器,获取并记录显示器信息
$ ioreg -lw0 | grep IODisplayPrefsKey
使用该命令会输出 MacBook 当前连接的所有显示器,其中 AppleBacklightDisplay 代表内部显示器,AppleDisplay 代表外部监视器。例如,我的输出如下:
"IODisplayPrefsKey" = "IOService:/AppleACPIPlatformExpert/PCI0@0/AppleACPIPCI/IGPU@2/AppleIntelFramebuffer@0/display0/AppleBacklightDisplay-610-a03e"
"IODisplayPrefsKey" = "IOService:/AppleACPIPlatformExpert/PCI0@0/AppleACPIPCI/IGPU@2/AppleIntelFramebuffer@2/display0/AppleDisplay-10ac-d0c1"
其中第二行代表我的 Dell 显示器,行末的 10ac 字段是 DisplayVendorId ,d0c1 字段是 DisplayProductID。将这两个参数记录下来。
Step 3
通过网页生成需要的 plist 配置文件。打开网页
https://comsysto.github.io/Display-Override-PropertyList-File-Parser-and-Generator-with-HiDPI-Support-For-Scaled-Resolutions/
填入上一步记录的 DisplayProductID 和 DisplayVendorId ,配置想要的分辨率,然后点击 Download DisplayProductID-xxxx 下载配置好的 plist 文件。
Step 4
这一步由于需要往系统文件夹写入文件,所以必须先禁用系统完整性保护(System Integrity Protection),步骤如下:
- 重启 Mac,启动时按住 Command + R,进入 Recovery 模式。
- 当出现 MacOS Utilities”/”OS X Utilities 屏幕时,按下屏幕顶部的 Utilities 菜单,然后选择 Terminal。
- 输入命令
$ csrutil disable; reboot 。
Mac 自动重启后,在 Terminal 输入如下命令,将 plist 文件拷贝至系统目录。
注意:命令中的三处 xxxx 需要替换成自己显示器的信息。
$ sudo cp ~/Downloads/DisplayProductID-xxxx.plist /System/Library/Displays/Contents/Resources/Overrides/DisplayVendorID-xxxx/DisplayProductID-xxxx
2020.10 注
这一步如不能成功拷贝,可以尝试运行 one-key-hidpi,输入 2,就能成功拷贝了,然后退出 one-key-hidpi 即可。
快速运行 one-key-hidpi: $ bash -c “$(curl -fsSL https://raw.githubusercontent.com/xzhih/one-key-hidpi/master/hidpi.sh)”
完成后,建议重新开启系统完整性保护,步骤同上,命令为 $ csrutil enable 。
Step 5
重启 Mac,此时已经可以使用自己配置的分辨率了。
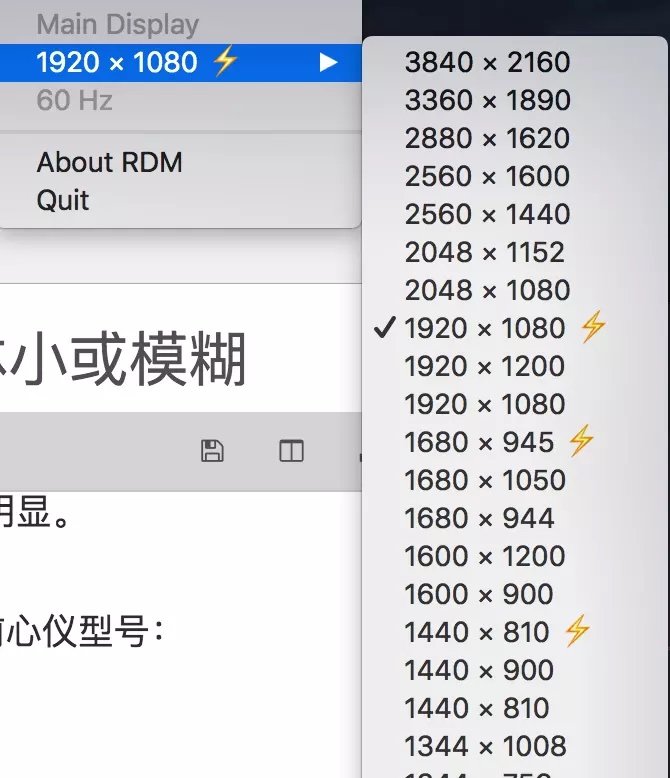
此时,还需要安装一个分辨率更改工具,推荐 RDM,这是一款开源好用的分辨率调节工具。
享受 HiDPI 带来的愉悦观感吧~
写在最后
我的 P2418D 显示器默认分辨率为 2560x1440,开启 HiDPI 后,仅显示 1920x1080 信息量,相当于之前 1 个像素内容用 1.3 个像素来表达。实际显示效果十分惊艳,字体相对之前更大,也更清晰了,Amazing。
参考
- https://zhuanlan.zhihu.com/p/20684620
- https://www.jianshu.com/p/4ea389848679
- https://comsysto.github.io/Display-Override-PropertyList-File-Parser-and-Generator-with-HiDPI-Support-For-Scaled-Resolutions/
- http://osxdaily.com/2015/10/05/disable-rootless-system-integrity-protection-mac-os-x/
I recently picked up an external monitor for my MacBook Pro — a Dell P2418D, a 23.8” 2K display with a pivot stand, 99% sRGB coverage, and factory color calibration.
A quick guide to Dell's monitor naming
Dell's product lines are U/P/S/E, standing for Ultimate/Professional/Standard/Entry. The four digits that follow encode size (first two) and release year (last two). The trailing letter indicates resolution: K/Q/D/H = 8K/4K/2K/1080p.
My P2418D: P-series, 24”, released in 2018, 2K.
It arrived in a day and lit up perfectly. But something felt off: at 2560×1440, text looked slightly blurry and soft, and despite the larger screen, everything was tiny at native resolution.
Why does text look blurry on an external monitor?
The root cause is HiDPI — or the lack of it.
Apple introduced Retina displays with the iPhone 4 in 2010, and has since brought it to iPads, MacBooks, and iMacs. The idea: at typical viewing distances, pixels become invisible, making content look smooth and sharp. Retina achieves this through two things: high PPI hardware, and a software rendering mode called HiDPI.
HiDPI renders each logical pixel using 4× the actual pixels, keeping UI elements the same physical size while making them dramatically crisper.
In short: high PPI (hardware) + HiDPI rendering (software) = Retina display quality.
The problem: macOS only enables HiDPI by default on 4K and above. On a 2K monitor, you have to turn it on manually.
How to enable HiDPI on a 2K external monitor
The overall approach is to write a custom plist override file to:
/System/Library/Displays/Contents/Resources/Overrides/DisplayVendorID-xxxx/DisplayProductID-xxxx
Step 1
Enable HiDPI mode system-wide:
$ sudo defaults write /Library/Preferences/com.apple.windowserver.plist DisplayResolutionEnabled -bool true
Step 2
Connect your monitor and get its identifiers:
$ ioreg -lw0 | grep IODisplayPrefsKey
This lists all connected displays. AppleBacklightDisplay is the internal display; AppleDisplay is external. My output looked like:
"IODisplayPrefsKey" = "IOService:/...AppleBacklightDisplay-610-a03e"
"IODisplayPrefsKey" = "IOService:/...AppleDisplay-10ac-d0c1"
The last segment of the external display line gives you DisplayVendorId (10ac) and DisplayProductID (d0c1). Note these down.
Step 3
Generate a custom plist file using this web tool:
https://comsysto.github.io/Display-Override-PropertyList-File-Parser-and-Generator-with-HiDPI-Support-For-Scaled-Resolutions/
Enter your DisplayProductID and DisplayVendorId, configure your desired resolutions, and download the generated plist file.
Step 4
Writing to system directories requires disabling System Integrity Protection (SIP):
- Restart your Mac and hold Command + R at boot to enter Recovery Mode.
- From the Utilities menu, open Terminal.
- Run
csrutil disable; reboot.
After reboot, copy the plist to the system directory (replace xxxx with your display's values):
$ sudo cp ~/Downloads/DisplayProductID-xxxx.plist /System/Library/Displays/Contents/Resources/Overrides/DisplayVendorID-xxxx/DisplayProductID-xxxx
2020.10 update: If the copy fails, try running one-key-hidpi, select option 2, then exit. It handles the file placement for you.
Quick run: bash -c "$(curl -fsSL https://raw.githubusercontent.com/xzhih/one-key-hidpi/master/hidpi.sh)"
Re-enable SIP afterward with csrutil enable (same Recovery Mode process).
Step 5
Restart. You can now select your custom resolutions.
Install RDM, an open-source resolution switcher, to conveniently switch between them from the menu bar.
Result
My P2418D at 2560×1440 with HiDPI enabled effectively renders at 1920×1080 logical resolution — each pixel expressed with 1.3× the physical pixels. The improvement in text sharpness is striking. Highly worth the setup effort.
References
- https://zhuanlan.zhihu.com/p/20684620
- https://www.jianshu.com/p/4ea389848679
- https://comsysto.github.io/Display-Override-PropertyList-File-Parser-and-Generator-with-HiDPI-Support-For-Scaled-Resolutions/
- http://osxdaily.com/2015/10/05/disable-rootless-system-integrity-protection-mac-os-x/